 ok ... ive lost count ... this would be claro walnut slab table number ... hmmm ... 11? 12? more? ive lost count. anychoice, they are all really fun and i will have another one coming out of the finish room this week for my upcoming svac show. this one is going to be crated and shipped to england, via boston or new york. its an easy breakdown and the base bolts together so everything can be shipped flat ... click the photos to enlarge them ...
 as usual, we started with a slab from our friends at goodhope hardwoods in southeastern pennsylvania .. this one had a small issue, but we were able to work around it with a little judicious epoxy filling which youll see a close up of later in this post.
 the client is an interior designer in london, and her client wanted a different shape, low to the ground for the table base. after a little model making (we sent one to england via fed ex) we got our deposit check and ordered the slab.
 the slab arrived almost immediately and it was then that we learned that the house was under construction and wont be finished until may. so, we had a nice slab around for a few months and well keep it around maybe one more week to show it off and then into the crate it will go and off for a cruise.
 we had our new base pieces cut at a.l. melanson in rutland, and jim drilled and tapped them, polished them up and made em black and then finished them with a little clear coat.
 underview of the bases bolted onto the table ... RIGID ...
 we stuck a few of our ladderbacks into the picture to make it look like guests were arriving ...
 thats the hole in the front left corner ... we mixed small chunks of claro walnut in with the epoxy so it almost looks like a little burl rather than a solid color fill ... we used a knife grade epoxy from eastern marble and granite supply for the main fill and a little touch up and leveling with other epoxies and sawdust mixes ...
 there were 5 butterflies total .... pretty good for a big slab like this ...
 in this picture, you can also kind of see the filling of the ant spot you can see in the raw slab photo. all in, all done ... well be adding the base to the next one this week after we make a couple of deliveries to empty things out a little ...
the three photos below are from previous blog posts that you can find by clicking the category claro walnut slab tables off to the right there.


 Will recently completed this nice jewelry box for a client to give to his wife for Christmas ... It was a surprise, but the cats out of the bag by now Im sure ... It was a nice little project ....Click the photos to enlarge them ... Above is the back side ...
 From the front .... We used a piece of figured cherry left from the new trestle table we delivered the weekend before Christmas ... The square trays are about an inch tall and slide side to side or lift out easily ... The mirror was a last minute addition ...
 Will did the walnut inlay with the initials on the cnc ...
 When he glued up the box, we werent sure whether the outside was to be stained or not. Since the bottom of the drawer and the top compartment are covered with a suede like fabric, we shellacked the interior before the glue up and taped it off for staining and finishing the outside ...
 Will fitted up the drawer and installed the hinges before disassembling the box for finishing ...
 The dividers, taped off
 From the front before finishing ... Weve got a CAD drawing somewhere ... I think its about 10 x 14 x 7 high
 winters over here as of today ... bluebirds are back in the yard, buzzards are back, ducks are back, 70 degrees today, the convertible top was down, fire in the sky, and its only the middle of march. what next tomorrow? hummingbirds? golf? maybe on the golf, another month at least until hummingbirds ... peace ...
 great sunset on peters peak

 will has been working on this studio style console table/sideboard for one of our midwest clients. wwe made a coffee table for them back in 2003? or so and after going back and forth on woods, colors and designs, we ended up with this design, a slightly contemporized version of a sideboard from my own house. its a classic example of our studio style and below you can see it go from conception to completion ... click the photos to enlarge them ....
 start with the legs and mortise them and fit up the tenons on the frame parts below ...
 than add the dust frames that the drawers ride on ...
 fill out (shim) the sides to keep the drawers running straight ....
 add the knife hinges for the center doors ... we went back and forth on other hinge options but while these are the fussiest and most time consuming, they also are the cleanest and least obvious ...
 lots of pieces ...
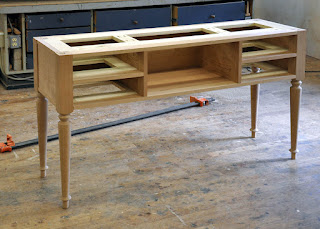

 here will is gluing up the case and preparing to add the ends. the interiors are shellacked and waxed and ready for the final fitting of the drawers and doors .. wrapping it up soon ...
 love the hat ... i ended it up with it after my father died. my uncle picked it up for him on one of his road trips. mosheim market was/is? located in mosheim tennessee, small town likely named for one of our unknown mosheim ancestors ... there arent many of them that i know of ... a branch in argentina, one in austria ... i remeber in the 80s that my uncle said they gave him the keys to the city as he was the only mosheim in anyones memory that had ever come to town.
 ok .. home stretch today ..
 we made several photoshop mockups and cad drawings to help the clients visualize the space .. more on that later ...
 here are some shaded cad drawings showing a few different possibilities, and above, the finial cad drawing ...


