
update 10/31 ... were on the home stretch on this project now. well be delivering the sideboard and table today and the 8 chairs later in the week. coincidentally, we have another dining room coming up next. an oval table (52 x 86), 8 chairs and a corner cupboard ... click the photos to enlarge them ...


the 8 chairs before the arms and the finishing ..

here we have our arm adding process. essentially, we use the mdf too keep the arm blanks parallel to the seat rails until we can do the joinery and the final shaping

the completed armchairs ...


10/16 ... on our website you can see a type of furniture we refer to as our studio style, which could also be thought of as a signature or default style ... the kind of stuff we have made for 25 years for many clients and for our own home. it design nidea originated with a client who spent some time in germany and commissioned us to build a custom desk for her like the furniture she saw when she lived there. i later came to understand that what she was describing to me was actually furniture in the biedermeier style. that was in 1986, before one of the definitive books on the style was published about 1992 and, believe it or not, before the internet and google even. so we kind of made it up on our own. these pieces are direct descendants of that german and austrian idea from the mid 1800s. must have been in my german blood. click the photos to enlarge them.

the construction process for these designs requires first building the piece and then completely disassembling it for the coloring and varnishing. the pieces above are for the sideboard that is part of this commission. it is identical to one in my own home except that the center detail will be part of an oval instead of the angled geometric one in the photo below.

loyal readers have probably seen this one before ...

heres how it goes ... in the early stages, all the details are left flat so they can be registered with each other and then the shadows and bevels are cut when the individual pieces are disassembled for coloring and finishing ...

at this point, nothing is glued, though the web frames are screwed to the insides of the face pieces, and the piece is completely rigid.

we leave the lower rail element uncut at this time too ... and then the drawer faces and the central element are fitted tightly in the holes. the final fitting happens after the case is finished and glued up ...


dovetail time ...


pulls and more finish tomorrow ...
the palette for this project is natural cherry and curly hard maple, with ebony and black milk paint details

here will is reassembling the table base that he made a few weeks ago.

the top and leaves of the table have a curly maple and ebony inlay that we routed out and filled back in. ... here lorne has finished installing the ebony borders before fitting up the 1/8th" central curly maple veneers.

once the bottom of the top is finished, the base is assembled and installed, the table is flipped, and the top is final scraped, sanded, and finished on its base ... runners again from our friends at moin hardware.

tah daahhhhh ... with the leaves in, before the fnish. 10 x 42" wide

a quick finish sample/palette study for the clients


we will be wrapping up the chairs and the sideboard this week ... delivery time soon ... more on all of it as we finish up ....

lots of pieces to keep track of ....


 will has been working on this studio style console table/sideboard for one of our midwest clients. wwe made a coffee table for them back in 2003? or so and after going back and forth on woods, colors and designs, we ended up with this design, a slightly contemporized version of a sideboard from my own house. its a classic example of our studio style and below you can see it go from conception to completion ... click the photos to enlarge them ....
 start with the legs and mortise them and fit up the tenons on the frame parts below ...
 than add the dust frames that the drawers ride on ...
 fill out (shim) the sides to keep the drawers running straight ....
 add the knife hinges for the center doors ... we went back and forth on other hinge options but while these are the fussiest and most time consuming, they also are the cleanest and least obvious ...
 lots of pieces ...
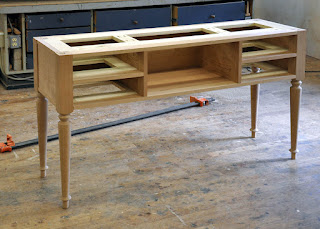

 here will is gluing up the case and preparing to add the ends. the interiors are shellacked and waxed and ready for the final fitting of the drawers and doors .. wrapping it up soon ...
 love the hat ... i ended it up with it after my father died. my uncle picked it up for him on one of his road trips. mosheim market was/is? located in mosheim tennessee, small town likely named for one of our unknown mosheim ancestors ... there arent many of them that i know of ... a branch in argentina, one in austria ... i remeber in the 80s that my uncle said they gave him the keys to the city as he was the only mosheim in anyones memory that had ever come to town.
 ok .. home stretch today ..
 we made several photoshop mockups and cad drawings to help the clients visualize the space .. more on that later ...
 here are some shaded cad drawings showing a few different possibilities, and above, the finial cad drawing ...


