
well, sam had another second floor balcony project recently ... heres the first one ... there was some head scratching and a little rework, but in the end, it looks great and the clients are pleased ... ever since i was a carpenter in the 70s i have struggled with the oval shape ... its been a lot easier since the advent of cad drawing and cnc cutting, but ovals are never easy ... its just a difficult shape to do gracefully. so, try it in steel ... see how it goes .... click the photos to enlarge them ..

sam is lucky to have both the cad program and the cnc, which easily cut his main templates for the shape of the platform .... a little rolling, some torch work, and a fair amount of hammering and he had the platform shape under control ..

he then added the expanded steel floor by welding from the bottom.

then came the hard part ... forming the top and bottom rails from flat stock by cutting almost through every inch or so with the bandsaw, and then heating and bending it to shape ...

this picture is from an earlier post, linked above, and shows the cuts after the bending, but before the fill welding .... the fill welding on these 6 top and bottom plates added a new challenge ... as the cracks are welded, the piece grows, which isnt surprising when you discover it ... as you weld, you heat the metal; it expands; and you fill in the cracks and it stays at the larger size ... duh ... so a little cutting and rejoining in the flatter parts of the ovals and he was back in business...


then all you have to do is align the 3/8ths spindles so that they are square, plumb, parallel and in the right plane with the walls of the house. again with the cnc for the jigs, some judicious eyeballing and he was good to go ... to keep the frames square as the spindles were welded, sam added 1.5" verticals which were later cut off to form the clapboard angled mounting tabs you seen in the top photo ... it all required a test fit or two on site and some minor adjustments ...

he then fabricated the 5/8ths round stock detail, which was taken from the base of the clients desk which is in the room behind the balcony ... i think he made that in about 4 separate pieces that he then curved around the main railing and welded into place ...

it was all graceful and smooth in the end ... gold star for sam ... not an easy project and he came in right exactly on budget ...

 will has been working on this studio style console table/sideboard for one of our midwest clients. wwe made a coffee table for them back in 2003? or so and after going back and forth on woods, colors and designs, we ended up with this design, a slightly contemporized version of a sideboard from my own house. its a classic example of our studio style and below you can see it go from conception to completion ... click the photos to enlarge them ....
 start with the legs and mortise them and fit up the tenons on the frame parts below ...
 than add the dust frames that the drawers ride on ...
 fill out (shim) the sides to keep the drawers running straight ....
 add the knife hinges for the center doors ... we went back and forth on other hinge options but while these are the fussiest and most time consuming, they also are the cleanest and least obvious ...
 lots of pieces ...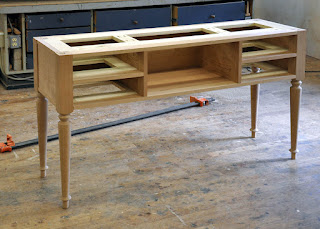

 here will is gluing up the case and preparing to add the ends. the interiors are shellacked and waxed and ready for the final fitting of the drawers and doors .. wrapping it up soon ...
 love the hat ... i ended it up with it after my father died. my uncle picked it up for him on one of his road trips. mosheim market was/is? located in mosheim tennessee, small town likely named for one of our unknown mosheim ancestors ... there arent many of them that i know of ... a branch in argentina, one in austria ... i remeber in the 80s that my uncle said they gave him the keys to the city as he was the only mosheim in anyones memory that had ever come to town.
 ok .. home stretch today ..
 we made several photoshop mockups and cad drawings to help the clients visualize the space .. more on that later ...
 here are some shaded cad drawings showing a few different possibilities, and above, the finial cad drawing ...


 the top table started with this monster slab, about 11 long and 3+ inches thick. we learned a few tricks on this one. it was a heav


 there was one sort of large (+/- 3/8ths") bolt in the slab that we drilled a bit and pounded a bit until it was below the surface enough to fill it so it looked like some of the other knots in the area. pretty good in the end.


